Bill Web Browser Plugin
Version 1.0A and more
Documentation: 28/02/2012
Our Internet site:
Email:
info@BillProduction.com
1
SOFTWARE
DESCRIPTION
This free resident plugin software, create a real-time connection
between Bill Redirect Application and your web application. With this
solution, you can communicate with any peripheral to transmit and
receive data directly with a web application.
The communication with
the peripheral is direct and bidirectional
(HTML TAG and Java Script)
.
Supported Operating Systems:
Windows 98,Me,2000,3000,XP,NT4,Vista, Windows 7
Simply the best solution to connect your peripherals (scale, pole display,
barcode scanner, proximity reader '
USB, Serial, UPD, TCP, Ethernet, Bluetooth, Wifi '
)
with a web application !
2
GENERAL INFORMATION
* This free plugin works with Bill Redirect version 6.0A and more
To configure this application you have to enter in the field password
www.billproduction.com
In Bill Redirect application configuration options you have the possibility to change this
password for what you want.
To use some Web Browser Plugins, you must start some instance of the software.
Use this syntax:
Bill_Web_Plugin.exe /#INSTANCE_NAME#
Each instance can have a different configuration !
Example: Create a Shortcut instance
Scanner_001
- Create a shortcut on your desktop to start Bill Redirect application
Shortcut properties:
- In the first field (Target) enter:
"C:\Program Files\BillProduction\Bill Web Browser plugin\Bill_Web_Plugin.exe" /#Scanner_001#
- Start our application with this shortcut
Example: Create a Shortcut instance
Scanner_002
- Create a shortcut on your desktop to start Bill Redirect application
Shortcut properties:
- In the first field (Target) enter:
"C:\Program Files\BillProduction\Bill Web Browser plugin\Bill_Web_Plugin.exe" /#Scanner_002#
- Start our application with this shortcut
Don't forget to push the Save Configuration button to save your current setting.
3
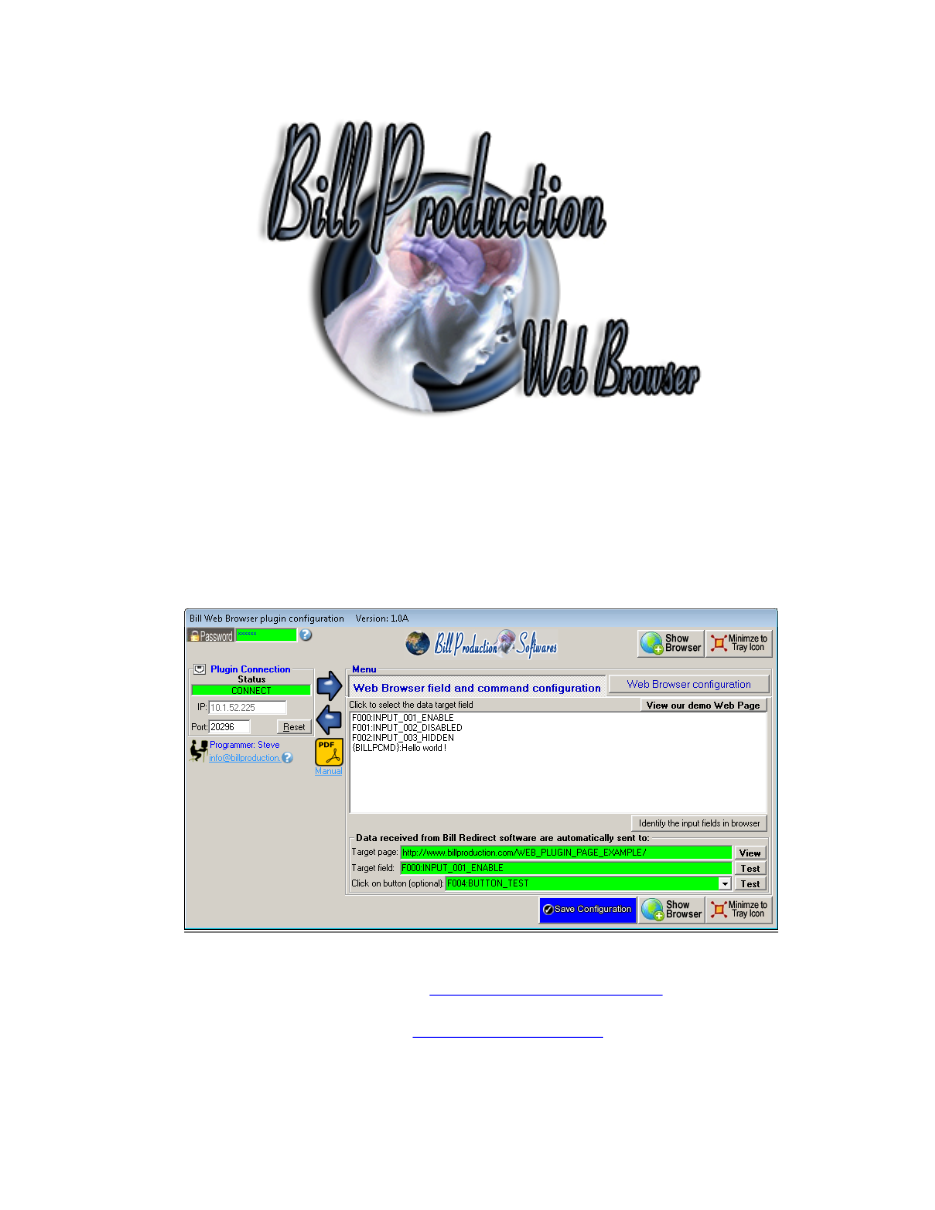
SOFTWARE DESCRIPTION
The Plugin Connection Status:
CONNECT, The connection is establish with Bill Redirect software.
RESET, Reset the TCP connection.
ERROR, Can't establish the connection.
You can see the error if you place your mouse cursor to the status field
.
LISTEN, The TCP port wait until the application Bill Redirect open the connection.
The IP:
In this field you can see the IP address of your computer.
The Port:
In this field enter the TCP PORT.
The Reset buttton:
Press on this button to reset the TCP communication.
4
SOFTWARE DESCRIPTION
(Continuation)
Menu: Web Browser field and command configuration
View our demo Web Page
Use this button to see our example web page.
Press to select the data target field
Use this section to select the target web page and field where the data must be sent.
Identify the input fields in browser
Use this button to identify the fields in the web browser.
Target page:
View
In this field enter the link of target web page where the data must be sent.
* If the back color field is GREEN then the web page is actually loaded.
* Press on View to load this web page in the web browser.
Target field:
This field contain the target field name, where the data must be sent on the web page.
* If the back color field is GREEN then the field actually exist in the web page.
* Press on Test to send data in this field.
Press on button (optional):
After each data sent on the web page our application can press on a button on the page.
Select the button
to press if you want use this option.
* If the back color field is GREEN then the button actually exist in the web page.
* Press on Test to simulate the action.
Show Browser
Use this button to see the browser.
Note: The data received are sent on the web page only if the target
page is loaded and the field is present in
the browser.
5
SOFTWARE DESCRIPTION
(Continuation)
Menu: Web Browser configuration
Customize toolbar (show / hide):
Use this section to define what will be displayed in the web browser toolbar.
Windows Configuration -
Hide Windows system menu:
Use this option to disable the Windows system menu bar and Start icon.
Customize browser:
Use this section to customize the web browser.
6
CONFIGURATION
To connect a peripheral and receive the data in Excel
Use this configuration:
Use this configuration if you run Bill Redirect on a different computer that
Web Browser Plugin
:
- Section
Keyboard Buffer
: Set the switch to:
Off
- Section '
Plugin
' set the switch to:
On
- Section '
Plugin
' press on the button:
Configuration
- At question #1 IP, enter the IP address that you can see in the application
'Web Browser (plugin)'
- At question #2 Port, enter the same port number that you use in
'Web Browser (plugin)'
Use this configuration if you run Bill Redirect and the
Excel Plugin
on the same computer:
- Section
Keyboard Buffer
: Set the switch to:
Off
- Section '
Plugin
' set the switch to:
On
- Section '
Plugin
' press on the button:
Configuration
- At question #1, IP enter:
127.0.0.1
- At question #2, Port enter the same port number that you use in
'Web Browser (plugin)'
Bill Redirect
Web Browser (plugin)
7
Web Browser (plugin) configuration:
-
In the configuration:
Press on button:
Show Browser
-
In the Browser:
enter the address of the web page where the data received from your peripheral
must be sent and press
Enter
.
* You can use our example to do your first test:
-
In the configuration:
Press on button: Identify the input fields in browser
*
In the Browser:
a number appear in each field
-
In the configuration:
Select in the list box the field where the data must be sent
-
Optional:
In the configuration:
After each data sent our application can press on a button in the page.
Select the button to press if you want use this option
-
In the configuration:
Press on button:
Save Configuration
Bill Redirect configuration example to connect a peripherals:
Barcode Reader:
Scale:
Other devices:
*** Important ***
Do what is indicated in this documentation except you must enable the
Plugin
section
and disable the
Keyboard Buffer
section.
8
Web Browser Plugin HTML TAG
To send data command from your web page to Bill Redirect peripheral use this HTML syntax TAG:
<INPUT TYPE=hidden NAME="SEND_COMMAND" VALUE="{BILLPCMD}
Hello world !
">
*** Note: Replace
Hello world !
by what you want.
Example HTML TAG to send Hello Word ! to serial port configured in Bill Redirect:
<INPUT TYPE=hidden NAME="SEND_COMMAND" VALUE="{BILLPCMD}{TX_SERIAL[Hello Word !{ASCII:13}]}">
Our web page example:
Use the Bill Redirect manual to see all the commands available:
*** Important ***
In Bill Redirect application in section Plugin you must set the switch to: ON
For more documentation visit:
9
For more flexibility/options or an installation package build for your company:
info@BillProduction.com
If a problem persist or to do more
use our
Application configuration and integration assistance
It's free, fast
(usually the same day)
, and efficient !
Submit your case to
info@billproduction.com
and receive a customized solution !
10